Wednesday, June 29, 2011

Mid-Atlantic 2nd Half Vegetable Planting Dates (Zone 7- Virginia, Maryland & North Carolina)

It's late June and if you're like me, harvest has begun for some vegetables and precious garden space is becoming more available by the day. What to do?

Well the good news is that many vegetables can still be successfully planted now or in the coming months for a good late season harvest.

For me I just planted Pumpkins and Wax Beans this week, and will plant squash, lettuce, broccoli & cauliflower going forward.
On this post, you'll find listed a number of vegetables and the dates by which they should be planted in the ground. The information provided here is based upon graphics and documentation provided from this Virginia Cooperative Extension 2009 PDF document, publication #426-331 via the Virginia Tech website.

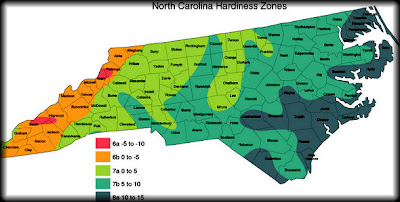
Though the planting dates are specifically calculated for growing in Hardiness Zone 7 in Virginia (based upon average date of last frost), this information may also be used fairly accurately for Zones 7 in the adjoining states North Carolina and Virginia (Mid-Atlantic region of the U.S.A.).
Based upon information in the PDF document, the average last date of frost for my specific area (Fredericksburg, VA.) appears to be around April 25. Therefore these calculations are based upon that specific date.

NOTE: The last frost for your area may be slightly different. To accurately adjust for your specific location, you will need to research & determine your average last frost date. For example, if it's April 15th, deduct 10 days from the given planting time frame, and if it's May 5th, add 10 days. If you're not quite sure, just use the dates given below.

Planting dates for Hardiness Zone 7 (Virginia & Mid-Atlantic, USA), starting from June 29, 2011:

TOO LATE TO PLANT (planting not recommended):

PLANT NOW (Last Chance):

PLANT SOON:
  • Beans (Bush), Now through July 24
  • Beans (Wax), Now through July 24
  • Corn (Sweet), Now through July 24
  • Pea (Southern), Now through August 3

PLANT IN THE NEAR FUTURE:

PLANT LATER:
If you live outside of the region specific to this article, the good news is that many of these same vegetables may still be grown for the 2nd half of the growing season. You will need to do your own research to identify your specific planting dates.

DISCLAIMER: Dates are not exact, only an estimation based on previous year's averages. Yearly results may vary due to climatological conditions (rainfall, heat), specific soil conditions, and individual care.


Friday, June 24, 2011

Living Off the Land By Growing, Harvesting & Sustaining Your Own Bamboo


Growing bamboo for sustainability may not be a right fit for everyone for numerous reasons. These may include a shortage of yard space, lack of conformity with the rest of the landscape, lack of devotion or time needed for harvesting etc.

But for others who are open-minded & into sustainability - is it really such a bad idea? Bamboo is extremely versatile and also a very green plant, generating 35% more oxygen than trees while reducing runoff by collecting extra nitrogen found in soil.

My connection with bamboo

As long as I have been vegetable gardening, I have been using bamboo sticks religiously to help support my plants The benefits for me include their ability to naturally blend in with the garden and their ability to bend & conform with the wind & weight of the plants.

Every so often when driving around (even in Virginia), I come across an area of bamboo. For some reason, this type of vegetation always draws my attention. Perhaps it's because they "seem" too tropical to grow or thrive in this region. That, however, is a widespread misconception - that bamboo can only grow in wet climates.

While bamboo is not a common plant in American gardens, especially the farther north you go, several species are native to USA and many others can tolerate temperatures as low as 0 degrees Fahrenheit (or lower). There are documented cases of bamboo not only surviving New England winters, but actually thriving there.

Bamboo has a reputation as being a hardy, tough plant. Curiously, although tree-like in many ways, bamboo is actually a grass - with giant bamboos being the largest member of the grass family. Their size can range from just a few inches high (low, clumping type), to a height of over 100 feet. Most bamboo prefer sun, but some can live in full shade (though growing smaller). They can be successfully planted on sloped surfaces and do best in sandy soil or red clay, but are tolerable with most soil types. Excessively wet soil should be avoided.


A variety of uses

While the shoots of the plant can be eaten (a topic best left for another persons blog), practical uses for bamboo include making fences, scaffolds, trellises, bridges, ladders and a variety of crafts (the possibilities are as varied as a person's imagination). In fact, bamboo is said to be used by more humans for more different purposes than any other plant.

Bamboo Fence
Though Bamboo can be grown in containers, this is not practical for sustainable use. For this purpose, they should be grown in the ground.

Because bamboo roots are aggressive 'runners,' spreading quickly, extra attention should be taken when initially planning & planting bamboo. To help avoid spreading, a 2-3 foot deep solid barrier should be initially installed.

With a right eye for landscape design (and a potpourri of sizes & species to choose from), the possibilities of landscaping or decorating your space are many. Since these plants can be split, you theoretically never have to buy more - just split & transplant yearly. And best of all, like your lawn, bamboo is a grass & thus it is low maintenance.

Sustainability for gardeners

Gardeners may be most familiar with bamboo for its use as a plant stake.

Plant stakes
As gardeners, we are becoming more self-sufficient every year, so why not entertain the idea of growing our own bamboo plants? For the very least, the plant should pay for itself with just a few harvests of canes for our personal garden use (have you seen the price of bamboo sticks recently?).

But before you go out buying - then planting - some bamboo to use as sticks for next year's garden, think again. You'll need an initial investment of time to reap these benefits. It's said that culms (the part use for sticks) reaches its strongest point from 2 to 5 years of age. Before using, they will also need to be dried on a flat surface through the winter.

Finding the right bamboo

If interested in growing bamboo for sustainable or general landscaping use, do extensive internet research and/or try to find a nearby bamboo nursery and come prepared with questions, facts & requirements specific to your needs. These may include your area climate (rainfall, hottest/coldest temps etc.), height requirement, sun or shade, soil conditions, large or small plot of land, and will the bamboo be used for decor, privacy screen or as a windbreak?

Helpful Bamboo Links:

American Bamboo Society
Complete Bamboo (Bamboo Information Resource)
Bamboo Bob's Blog
Wikipedia

*DISCLAIMER: Before using any information contained in this blog entry, you are advised to do your own due diligence & research on the topic and/or consult with a qualified professional.

Tuesday, June 21, 2011

Taking Advantage of the Rain & Mud: Supporting Fallen Potato Plants


Well if you're like me and have 2 to 3 foot maturing mounded-up potato plants, your plants may be in need of support - literally.

Almost daily these days, I walk around my rows of potatoes constantly adjusting and re-positioning my bamboo sticks to keep some fallen potato plants standing upright. But it doesn't seem to be enough.
Potato Plants, some fallen over, before supporting w/ muddy soil
Monday morning while I was doing my daily ritualistic walk in & around my garden, two things came to me: 1) I need to till in between rows to rid these grass & weeds, but can't due to the day-after-day rains (another day/another blog post), and 2) Some of my potato plants need some helping standing straight.

Then it occurred to me: Why don't I take advantage of this mud, get dirty, and pack some of it around the bases of the potato plants. BRILLIANT! Off I went.

Mounding wet dirt around potato plant base for support
Just because potato plants fall over, it does not mean that they're dead or that they can't continue to grow or prosper. I personally choose to keep them upright because it gives me peace of mind, makes my garden look tidy, and allows me to till better in-between my rows.

If there is a downside to this, it's that water might opt to run off rather than soak into the soil due to the excessive packing of the soil, but that's a trade off I'm willing to take.

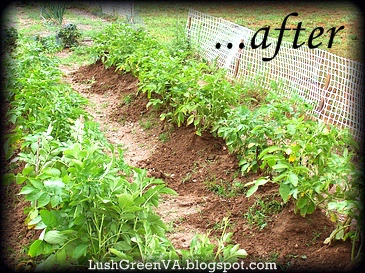
Potato plants now standing upright
Hopefully this will be enough to keep the potatoes standing up straight until they're ready for harvest, but I seriously doubt it. If not, you know where I'll be after the next heavy rain -- gettin' dirty again.


Sunday, June 19, 2011

Look what I found: Giant Leopard Moth Caterpillar

Strange looking critter picked up cautiously with shovel
A little while back while moving my firewood pile to a new location, I came upon an initially scary looking furry creature.

Balled-up (presumably frightened), I thought this could be a caterpillar but was uncertain.

So, after snapping a few pictures, I went inside and googled every descriptive word regarding its appearance, and quickly was able to identify this monster as the Giant Leopard Moth (in caterpillar stage of course).


It turns out this caterpillar is not a monster at all. Though many bristled, furry caterpillars are toxic if touched, the Giant Leopard Moth is harmless to humans. In fact, many children adore these critters and keep them as pets.

Found mainly in eastern & southern USA from New England to Mexico, this caterpillar has a thick bristly black coat & shows orange and red color bands as it curls into a ball formation when frightened (as seen in my snapshots above).

Though craving daylight as a caterpillar, it becomes nocturnal as soon as it transforms into a moth and then sports a 3" wingspan.

The Giant Leopard Moth Caterpillar is not considered a pest with the possible exception in pastures.

This insect is strikingly beautiful in both caterpillar & moth stage


Friday, June 17, 2011

What is this? There are fruits growing on my potato plants!


Yesterday while propping up some fallen potato stalks, I noticed something peculiar -- two green cherry-tomato-like fruits dangling from one of my bushes. Actually - just weeks earlier - I had read that some potato bushes actually produce these berries, so I kinda knew immediately what these were.


So what are these?

Anyone who grows potatoes knows that some potato plants produce flowers and some don't. Even more rare (but not unusual) is a potato flower that produces a tiny fruit. Each little fruit (poisonous - do not eat!) are the bearer of several dozen or so tomato-like seeds. They are actually called 'True Potato Seeds' or TPS. These are not the same as "Seed Potatoes," the store-bought (or home prepared) spuds with vines already growing from them - which most people use to grow their own potatoes.

Here's the strange part

As better explained in these Daughter Of The Soil blog posts (here and here), these seeds are not related to the tuber the flowers grew from. These seeds actually produce a variety of potato all its own:
"... TPS is not the tuber, but the actual seeds - which come from the plant's flowers and fruits. As seeds are produced by sexual means, a coming together of egg and pollen from different flowers or different plants, they represent a genetic recombination. In other words, they are not genetically identical to the parent plant. They are newly created individuals ..."
If I grow from seed, what should I expect?

As for the process, potatoes from TPS are sowed much the same as you would tomatoes or other plants - start growing indoors and transplant them outdoors some time in Spring. To extract the seeds, you would need to mash these little fruits up real good, place them in a glass of water for a few days. Wait until the seeds separate and sink to the bottom, dry out and save for next year.

The resulting harvest yield will be minimal, at least during the first year. Your first TPS harvest is likely to yield fewer & smaller potato spuds as opposed to growing by traditional means. However, if you save your best potatoes from your first harvest & plant those the following year, your potato harvest should improve. Repeat for several years and who knows, perhaps you have created your very own prized new potato variety.

My Potatoes, 6/15/11
So, what's the verdict on TPS

Growing from TPS is not for everyone. However if you have extra garden space, are willing to put forth more effort, you love experimentation, and are willing to spend years crafting your newly created potato variety, this may be a fun endeavor. Personally I have not decided whether to pursue this path -- for now I will extract the seed, preserve them, and decide my course of action later.


NEW  LushGreenVA's aStore - powered by Amazon
Clutter-free shopping for vegetable gardeners. Every product hand-picked and smartly categorized by me, H. Mikael - many are similar to one's I use myself, including: Composters, Raised beds, Greenhouses/Cold Frames, Rain Barrels, Rear-tine Tillers and Cultivators

Wednesday, June 15, 2011

Carpenter Bees & Purple Coneflowers (Echinacea)


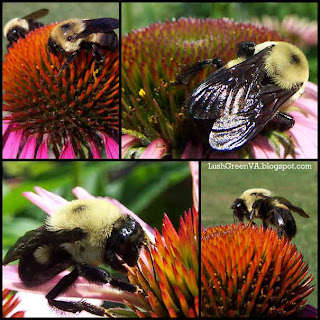
Carpenter Bee Launching From Coneflower
Well, it was such a beautiful, sunny morning yesterday, I decided to snap some pictures of my recently blooming Purple Coneflowers. But as I soon discovered, it turned out to be primarily a Carpenter Bee photo-shoot, as these bees simply love gathering pollen from these lovely plants.

Personally I am not afraid of bees. My theory is that they mind their own business, and I mind mine. Don't harm them and you'll be OK.

I also know for a fact that Carpenter Bees are even more docile than any of their cousins. So there I was in camera macro mode - inches away - snapping a bunch of pictures. Here are the results:

About the Purple Coneflower (Echinacea)

The purple coneflower is a native plant to America and southern parts of Canada, meaning this is the only place on earth where it grows in the wild. It is cultivated however in many other places worldwide.

Its name "cone flower" comes from the way the flowers literally look - having a medium to large cone at the center of the flower. This cone typically has between 200-300 tiny spiny-looking florets. Wikipedia says these plants can grow to 55 inches (140cm), but I have some growing right now in my yard at 60 inches (I will take a picture for a future post).
Closeup of a freshly blooming Coneflower
In the daisy family of plants, Echinacea has become a favorite of many North American gardeners in recent decades for its beautiful colorful flowers, lengthy bloom period, easy maintenance and its ability to return year-after-year (perennial). They will reseed come Fall, and new growth will ensue the following Spring.

Virtually all parts of the echinacea plant have been used for centuries (starting with Native American Indians) as herbal medicine. In mainstream culture, Echinacea's popularity & use increased dramatically from around the mid 1800's to early 1900's, and its medicinal potential has sparked a rebirth of interest in recent times.

While many of its true benefits are still being discovered today, there is enough scientific data to indicate that Echinacea can strengthen the immune system while helping prevent or reduce the duration of a cold. It may also help ward off infections, relieve pain, repair minor skin wounds, and work as an effective laxative.


(Click to view enlarged picture)

Friday, June 10, 2011

The 4 Essentials To Start & Maintain A Vegetable Garden By Yourself


I'm a simple all around guy. This includes my vegetable garden where I rarely use any fancy tools or pesticides/fertilizers etc., except when necessary.

If you're contemplating beginning a vegetable garden, do not be overwhelmed or intimidated by the wide assortment of gardening tools you see on hardware store shelves or aisles. Sure, there are numerous specialty tools for any given need, but you can purchase those along the way as needed.

The biggest concern you should have for operating a vegetable garden is how much free time, patience and sweat you're willing to give towards this new endeavor.

The following are the four essentials I can't do without to help maintain my 24 X 63 foot garden:

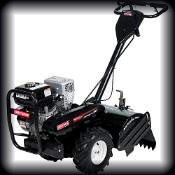
Dual-tine Tiller
1.) Tiller: Unless your garden is the size of a coffin (or you're willing to work yourself to death), you'll probably be wise to invest in some type of motorized tiller.

For normal non-farm purposes, motorized tillers are usually guided (self propelled) and/or pushed by hand and come with a variety of options. These include whether to get a unit with single or dual tines (these are the rotating blades at ground level -- dual tines offer a wider tilling length), whether the tines rotate in reverse (which works the soil better), and whether it comes with the ability to adjust the tilling depth (deeper is better).

Personal Note: I use a reverse rotating dual-tine tiller (similar to unit pictured above right). Without it my 1500 sq. foot garden would be a miniaturized. This behemoth, though self-propelled), still requires a good deal of muscle to turn & maneuver and to keep straight & steady, giving me the much needed exercise I don't otherwise give myself.

Mantis Tiller
One cost-effective option (pictured to the left) is the small, more compact tiller you may have seen on TV. It's the affordable Mantis Tiller, more suitable where space is limited and where the soil is not too hard.

On average I use a motorized tiller every few weeks, depending on the growth rate of weeds in-between rows. Two to three passes over each area is usually sufficient during season.

Garden Claw
Even more compact and manual, consider using a tilling device such as the Garden Claw(pictured to the right, these are made by many companies using a variety of different names). Requiring a bit of upper body muscle & leverage, the Garden Clawworks by manually twisting the handles at the top which creates a tilled hole at the precise spot where you need to insert your plant. I actually use one of these in addition to my motorized tiller, and love it.

BUYING HINT: Wait until late in the season (around September?) to buy a re-conditioned/re-furbished tiller from Sears (the one's they display outside the store). These tillers are marked down weekly until they are sold and come with a full warranty, as if you're purchasing a new model. We bought a $900 tiller for about $250 (no kidding!) in 2009. It has run flawlessly!

2.) Garden Rake: This is the standard tool that belongs in any tool shed (no picture necessary). After tilling, you'll need to use your rake to smooth out & flatten the soil surface (this helps prevent pond-ing of water in the crevices left behind).

Garden Hoe
3.) Garden Hoe: Anyone who uses a garden hoe knows the importance of this tool. It is especially vital for me since I grow several rows of potatoes. There is no better tool to help mound up dirt around my potato plants as they grow skyward.

HINT: Avoid the cheap Big Lots garden hoes! Whatever you do, get yourself a good quality name-brand hoe from the hardware store -- you won't regret it.

Action Hoe
4.) Action Hoe: I just discovered this under-rated, magnificent tool at work last year.

Like a garden hoe, this tool requires a minimum amount of bending, and is used to undercut the soil to remove weeds. Sure it won't completely remove deep rooted weeds, but the action hoe will knock 'em out for a few days at which point you can repeat the process. Just walk through your garden a few minutes each day, and the action hoe will help prevent tedious lengthy weed-removal sessions later.

BUYING HINT: At the store, you may notice that the end of an action hoe seems loose and jiggles a bit. This is normal & perfectly OK. This "give" actually makes this tool perform better.

THE VERDICT:
Gardening does not have to be expensive but if you plan on operating a tiller by yourself, you need to be in good physical condition.

A good tiller may set you back some financially, as may the cost of fertilizers etc.

But if you go completely organic like I do, it's cheaper yet.


NEW  LushGreenVA's aStore - powered by Amazon
Clutter-free shopping for vegetable gardeners. Every product hand-picked and smartly categorized by me, H. Mikael - many are similar to one's I use myself, including: Composters, Raised beds, Greenhouses/Cold Frames, Rain Barrels, Rear-tine Tillers and Cultivators

Wednesday, June 8, 2011

Rewind: Funny Looking Tomato From 2010


 Well, since I didn't have a blog last year, I thought I'd share a picture of a funny looking tomato from last season's crop:
Well I know what this looks like to me, but I'll let you draw your own conclusions ;)

Anyways here's what my "Tomato row" looks like today. Lots of new flowering but still waiting for fruit to emerge. This year I'm growing Bigger Boy, Beefsteak, Bush Goliath & Red Cherry tomatoes:


Wednesday, June 1, 2011

My $90 raised-bed herb garden (Memorial Day weekend project)


Now in my 3rd year of operating a 23' X 64' vegetable garden, I felt this was the right time to tackle another gardening project -- an herb garden.

Though I'm still fairly new when it comes to culinary use, I am eager & willing to learn more -- and I just love gardening!! Besides I know plenty of people who will gladly accept whatever herbs I don't use, and that alone would make me happy.

How it all came about.

I made this garden spontaneously (though I began planning it in my head weeks ago).

It all started Sunday morning when I went to the local farmers market and noticed that their herbs had been marked down from $2.50 to $1 each. Hmmmm I thought -- this is my chance to start an herb garden, why not buy 10 of these to get started.

Then my mind started vigorously racing & planning. From previous calculating, I already knew where & what size I wanted my herb garden to be. I checked my Memorial Day Weekend Home Depot sales flyer, and there they were -- soil & landscape timber on sale. Off I went to purchase.

Here is the cost breakdown:
  • 12 8' Landscape Timber Boards (Memorial weekend sale)= $24
  • 9.5 bags 1 c. ft. Scott's Garden Soil (Memorial weekend sale)=  $24
  • 9.5 bags Generic Top Soil (Memorial weekend sale)= $10
  • 1 box 4" nails = $4
  • 24 herb plants, $1 each (clearance sale @ Farmers Market) = $24
  • Wire fencing: Already owned (bought at yard sale, used about $1 worth)
  • Estimated Tax Paid: $3
TOTAL PRICE: $90

Construction notes:


*I made two 3' X 8' raised beds from my landscape timber boards (I had 4 2' pieces leftover from which I made an extra 2X2 bed). I was thinking about making these beds 4' wide but thought it would require a little too much bending, so I settled with the 3 foot width. I used my nails to hold them together.

*Yes I'm cheap, so I mixed 50%-50% my decent Scott's Garden Soil with a bag of generic Top Soil. I combined them together in a wheel barrow using a hoe. I'm happy with this mix - time shall tell with the results.

*As mentioned earlier, our local farmers market started marking down their leftover herb plants. They were $2.50 each just a few weeks back and now they are all just $1. Seeing that they are all mostly still healthy looking, I loaded up by buying $24 herb plants - mostly perennials but a few annuals such as chamomile, dill & basil.

*Using careful calculations and some basic internet research (height, spacing etc.), I planned & diagrammed the garden accordingly with taller plants farthest from the sun (to prevent sun blockage to lower lying plants). I cut my caging to appropriate sizes to act as barriers/mini trellises.

From start to finish (mid-day Sunday to mid-day Tuesday) it took about 2 afternoons of working in 90 to 98 degree heat. Here is the end result:
Not bad for $90, dontcha think? I will post updates on the progress.