Showing posts with label General Gardening. Show all posts

Tuesday, February 7, 2012

What To Do When Your Indoor Seeds Are Growing Much Faster Than Advertised?


This is my first year of growing seeds indoors, and I must admit I covered every angle of this process to perfection. I bought the right seeds, grow lights, heating mat etc... and have religiously followed many expert bloggers advice.

In fact I did too good of a job -- my seedlings are growing way too fast! After 10 days, they are where I thought they would be after one month.
Growth has been phenomenal and has exceeded my expectations.
My seedlings began emerging:
Cauliflower-2 days
Broccoli- 3 days
Tomato- 3 days
Lettuce- 3 days
Pepper- 4 days

After about 2 months, I was told I would need to transplant into bigger (3 X 3", or 4 X 4") pots, at which point I would be ready to place them outside in my greenhouse. According to plan, this would have occurred in late March.

However, it's looking like many of my seedlings will be ready for this process before the end of February.
Closer view of a variety of peppers and tomatoes.
A Chilling Thought

The thought of putting these plants outside in a greenhouse in late February is a little troublesome for me. In Virginia the average temperature still dips below freezing on most nights. Even in a greenhouse, this might put too much stress on the little fellas.
My Cauliflower's were the first to emerge, after just two days! They are already several inches high.
Thinking Ahead

For several weeks, my new plants will need a "half-way" house -- between the time they graduate from the seed tray to when they get a new temporary home in the greenhouse.

So I am already starting to plan in advance. Despite living in a small, crowded house with very little extra room, I have identified 6 spaces next to windows where I can place trays. Each tray fits 18 3X3" pots, which will cover 108 plants. 72 plants can go back under my grow lights.

This still leaves several dozen plants unaccounted for. Oh well, I'll have to cross that bridge when I get there.

Next year I will start my indoor seeds one month later ... you live and you learn.
 

Wednesday, February 1, 2012

New 2012 USDA Hardiness Zone Map Released - Changes Reflect Rising Temperatures Since Last Release

Updated once every several years to a few decades, the USDA has released an interactive GIS-based hardiness zone map for 2012. It is also available in static image form for slower connections.

Click image to view interactive link, or use links at the bottom of this post.
Gardeners beware ... the climate has changed over the last several decades and the government has reflected these changes with this new hardiness zone map. Most locations throughout the USA have remained the same or been notched up a half zone.

A half zone increase may not sound like much - it reflects a 5 degree change - but with first and last frost times so critical, one or two weeks could make a difference between plant life and death.

Stuck in-between zones and not sure which zone you belong to? No problem -- just type in your zip code and it will tell you.

Currently, the USDA has not printed any posters of this new 2012 map, but you can download state, regional and national maps in a variety of resolutions and print them yourself.

View Maps:

Interactive version for higher speed internet connections

Static version for slower internet connections


Thursday, January 19, 2012

FREE Seed Catalog List. 30 Companies That Will Mail You Their Latest Print Seed Catalogs Cost Free.

With experts and avid gardeners all ready to begin growing seeds indoors, it's time to get a game plan underway for your Spring garden. Browsing through catalogs is one of the finest ways to get great gardening ideas.

If you're like me, there's nothing like flipping through real-life magazines, newspapers and catalogs (it's just not the same in digital form!). That's why I still order print editions of my catalogs, and yes (in case you're wondering) I do still get my newspaper delivered to my house daily.

All of the following 30 links are verified to be working as of yesterday, January 19, 2012. Just fill out the requested information and these companies will send out a catalog at their earliest convenience. It's that simple.

NOTE: Where indicated, many of these companies also do offer a downloadable .PDF version (or other type of digital download) of the same catalog. Also keep in mind that some of these companies have not yet released their 2012 catalog, so make sure you don't request a 2011 version if you want a 2012.

DISCLAIMER: Unless otherwise stated, LushGreenVA neither personally endorses or opposes any of the following merchants. Please do your own due diligence if you intend to commit financially to these organizations.

THE LIST - FREE PRINT SEED CATALOGS:

Abundant Life Seeds (.PDF version also available)
Organic and biodynamic vegetable, flower, & herb seeds. Also garden supplies and tools.

Baker Creek Heirloom Seeds (.PDF version also available)
Pure heirloom, open-pollinated vegetable, flower, & herb seeds.

Botanical Interests (.PDF version also available)
Vegetable, flower, & herb seeds.

Bountiful Gardens
Heirloom, untreated and open-pollinated vegetable, flower, herb and other seeds.

Comstock Garden Seeds
Selling seeds for 200 years. Primarily Heirloom vegetable seeds, some flower & herb seeds.

Gurney's Seed & Nursery Co.
Popular company selling vegetable seeds & much more.

Harris Seeds
Since 1879, selling primarily vegetable seeds.

High Mowing Organic Seeds (.PDF version also available)
100% certified organic, non-GMO vegetable, flower, & herb seeds.

Irish Eyes Garden Seeds
Vegetable, flower, herb and other seeds, plus more.

John Scheepers Kitchen Garden Seeds
350 varieteies of vegetable, flower, & herb seeds.

Johnny's Selected Seeds
Vegetable, flower, and herb seeds.

Kitazawa Seed Co.  (.PDF version also available)
Specializing in over 250 Asian vegetable seed varieties.

neSeed
Selling vegetable, flower, & herb seeds in small or bulk quantities.

The Online Greenhouse
Some non-GMO and heirloom vegetable & flower Seeds, and other seed starting supplies.

Peaceful Valley Grow Organic
A section of organic vegetable and herb seeds, and open-pollinated flower seeds. Also a bunch of other stuff.

Richters (.PDF version also available)
Herb seeds, extracts, oils & more.

Seed Savers Exchange (.PDF version also available)
Non-profit organization dedicated to saving and sharing heirloom seeds. Vegetable, flower, herb seeds, and more.

Seeds of Change (.PDF version also available)
Organic vegetable, flower, and herb seeds. Also live plants, tools and supplies.

Select Seeds
Rare, choice heirloom flower and plant seeds, as well as a few herb seeds.

Southern Exposure Seed Exchange
My favorite, located here in Virginia. Specializing in mid-Atlantic seeds (zones 6-8) Huge and informative catalog full of vegetable, flower, & herb seeds.

Sow True Seeds (.PDF version also available - just click on catalog image!)
Vegetable, flower, and herb seeds. Open-pollinated/non-hybrid & untreated seeds featuring heirloom, organic & traditional varieties.

Territorial Seed Company (online version also available)
Family owned business selling vegetable, flower, and herb Seeds. Also live plants and garden supplies.

The Cook's Garden
Packed with seeds and live plants, including vegetables, annuals, perennials, herbs, garden-ready plants, gardening supplies and more.

Thompson & Morgan
Quality English seeds for over 150 years. Vegetable, herb, shrub and tree seeds + much more!

Totally Tomatoes (online version also available - see link near lower left)
Tomato, pepper and vegetable seeds, plus live plants, roots and berries.

Urban Farmer
Vegetable & herb seeds as well as Spring bulbs, and seed potatoes.

Veseys
Certified organic vegetable, flower, & herb seeds as well as bird feeders, tools and supplies.

Wild Garden Seed
Located in the Pacific northwest. Open-pollinated, untreated and organic vegetable & herbs seeds.

Willhite Seed Inc. (.PDF version also available)
In the seed business for 86 years. Vegetable as well as a few herb seeds.

Wednesday, July 27, 2011

Free Mulch By the Truckload? It May Be As Close As Your Local Landfill !


In a world where middle-men thrive and everyone seems to get a piece of the pie, it's rare to get anything good for FREE anymore.

Many gardeners are unaware that mulch, which usually goes for $4 to $10 a bag at a store, may be obtained free - right in their own community. Further yet, you may be able to load up your entire truck bed -- and come back for more tomorrow!

How is this possible? Well, many landfills provide the service of disposing peoples brush, which piles up quickly on their lots. As a courtesy, they shred these piles of discarded vegetation, and offer you - the resident - the opportunity to use this recycled matter as mulch.
Is free mulch available where I live?


Whether or not your landfill offers mulch depends on many factors such as whether the landfill is located in a urban or rural location, or if there's enough vegetation in your region to make this courtesy feasible. Usually, the availability of landfill mulch falls under one of three options:
  • Mulch is not offered at all.
  • It is offered, but in limited quantities.
  • The mulch is offered FREE, or at some cost.
Either way, you can check for availability by visiting your local landfill, calling your local government office for information, or checking on the internet -- many jurisdictions offer all the information you need on their website.


If mulch IS offered at your local landfill, keep in mind the following:
  • There may be a daily or weekly limit (although I wonder who really pays attention).
  • It may be offered for local citizens only (with proof of residency required).
  • Availability may be limited or seasonal - on a first come, first served basis.
Though some landfills will load your pickup truck for you - usually for a fee, most offer the option of manually loading the mulch by yourself. Of course you'll need to come properly equipped. For best results, you should show up with the following:
  • High boots to help move around the mulch pile more efficiently and prevent mulch chips from getting inside your shoes.
  • A nice, large pitchfork. You can use a shovel but trust me, nothing picks up mulch better than a pitchfork.
  • A truck with an open bed, or if you're picking up smaller quantities -- large containers (such as garbage bins), or large durable plastic bags ("durable" the key word here).
What type of mulch can I expect?

The type of mulch offered may vary widely from region-to-region depending on local vegetation types, and the time of the season.

For example, in areas where a lot of pine trees grow, the mulch may be more pine-based, whereas Florida residents may have more chopped-up palm trees in their mix.

Also, certain times of the year may yield different variety, such as in Fall or Spring when people prune & "tidy-up" more often.

Here on the east coast, the mulch is a pretty good mix of everything - and the quality is fairly consistent no matter what time of year I visit.

What's the quality like?


If you're expecting "fine," colored or specialty mulch like those found at your hardware store, you will be disappointed. This mulch is not that.

Based upon my personal experience at my local landfill, the free mulch I get is somewhat dull and light brown in color and, overall, the wood chips are slightly bigger, and more irregularly shaped than store-bought versions.

Because it's free, authorities utilize less manpower, money & attention to the entire process.

Commercial shredding operations may check for inconsistencies (such as plastic among the wood, and larger chucks), and may run their wood chips through a shredder several times to create better consistency.

The mulch at landfills, on the other hand, is usually shredded just once and not checked for inconsistencies.

Many residents are just lazy and rather than separating their brush from regular trash, some will throw everything in the brush pile. Therefore, amongst the wood chips, you'll occasionally find bits of "whatever else" - which you'll have to manually discard. This is usually not a big problem, but only a minor inconvenience.

Negative aspect.

Well you knew there has to be a catch. You know the old saying, "if it sounds to good to be true, then..."

Free mulch also comes with the 'unknown factor.' There is no way of telling whether your mulch comes from brush that's been previously tainted, treated or killed with harmful chemicals, or to which degree? Over time, when this mulch decomposes into the ground, will it have a harmful effect on your vegetation?

Added (7/28): As pointed out by WDCGardener on Twitter, Poison Ivy (or oak) is often discarded and mixed-in with the mulch. Therefore, although you should use them anyway - gloves are an absolute necessity when handling this mulch and of course don't allow it to come in contact with other parts of your skin.

Personally, I have used this mulch for years and all my vegetation appears to be growing without any noticeable problems (nor have I been infected with poison ivy - and yes, I am allergic to it).

Suggested uses.

With its somewhat dull hue & inconsistent appearance, free landfill mulch may be best suited for backyard use, or in places where it can't be easily seen by the public.

As a money saver, I like to use this mulch in combination with quality, colored commercial mulch. Placing your free mulch underneath the good mulch can add up to big savings. For example, 3 inches of free mulch covered by 2 inches of good mulch, saves your wallet 60%.

Final note.

Courtesy should be practiced and applied when transporting your free mulch. If you load a pickup, or otherwise are transporting an open load, please cover your mulch with a tarp (or other similar material) to help prevent debris from flying all over the place. Depending on your jurisdiction, it may be unlawful to do otherwise.


Thursday, July 21, 2011

Extreme Heat Vegetable Gardening: 11 Ways To Keep Your Garden Lush Green


Though it's been hotter than normal yet once again virtually all summer here in the mid-Atlantic states, we've yet to hit triple-digits on a recurring basis -- until now. The weather forecast calls for 100-103 degrees in my area today, Friday & Saturday.

My garden has held up extremely well so far this year. Except for the dying browning leaves of the potato plants (which is normal in any year/climate), my garden is maintaining its lush green hue.

But now it's time to get serious - to show what man vs. nature can do.

First & foremost, do not pay attention to the 'heat index' - rather focus your attention only on the temperature. The heat index measures a combination of temperature and humidity, and indicates how it feels to us humans. Since humidity is actually moisture content in the air, plants are not as negatively affected by it as humans. In fact, one can argue that plants (especially those tropical in nature - such as tomatoes & peppers) may actually benefit from the natural wetness humidity brings to the air. So even though we humans may suffer more when it's hot & humid as opposed to hot & dry, plants react opposite.

Develop a good watering 'game plan.'

1) Prioritize which plants need to be watered more & most frequently. Pay special attention to wilting or dying plants, and vegetation that naturally relies on more watering, such as melons, tomatoes etc. New plants also need more water than established ones because they are still trying to grow & establish roots needed for long-term survival.


2) During the heat wave, watering should only be attempted early in the morning or later in the evening. Mid-day watering may cause the moisture to evaporate more quickly and/or result in wilting of leaves. Generally speaking, try not to water between the hours of 10am & 7pm.

3) Before watering, allow the sun-heated water already inside the hose to exit before spraying in & around your vegetation. The plants are already stressed and pouring 150 degree water on them cannot be good. NOTE: I have recently read stories of people pouring ice cubes around their plants. This, too, actually stresses the plants rather than help them. Do not do this.

4) Using a hoe, self-irrigate or create temporary water flow channels as I show in this post. If you happen to get a rain shower, this helps direct excess water where it's most needed.

5) To also help prevent water run-off on dry hard dirt, loosen soil with a hoe by tilling the radius from between 6 to 18 inches from the plant stem (tilling too close may damage roots). This helps allow the ground to better soak up more moisture, more deeply. Water run-off can also be prevented by watering less more often, rather than watering more less often. In other words, water for 5 minutes twice a day rather than for 10 minutes once.

6) Since water on leaves should be avoided, so too should be the use of sprinklers. During hot & arid times, resort to watering with containers (like I explain in this post) or use a hand-held hose. Each method allows you to water only where it's most needed -- at or around the base of the plant. Better yet is the use of a drip irrigation system or a soaker hose. Each waters more slowly right at the soil level, preventing evaporation.

Additional tips.

1) Don't use fertilizer until after the heat wave subsides. Since fertilizer promotes new growth, it also boosts the need for more water.

2) Adding mulch around the plant is more important than ever. One or two inches of mulch helps retain water moisture & prevent the soil from drying out as fast.

3) Don't be afraid to prune back plants that appear to be suffering from the heat wave. However, don't attempt to prune if you're only trying to stimulate new growth - plants challenged by the heatwave will not benefit.

4) Removing weeds is especially important during these scorching, arid times. Each ounce of water is more valuable than ever, and sharing with weeds should not be an option.

5) Avoid spraying your plants with products that contain oil. The extreme heat combined with oil residue left behind may result in leaf burn.

Final word
Use this heat to take a much needed break from gardening -- only harvest & water as needed during the early or late day hours. Consider your time indoors (in air conditioning) like a mini-vacation, or use this extra free time planning your second-half vegetable garden. Lettuce, broccoli, cauliflower (among others) can still be planted going forward in most parts of the country.

And remember, heat waves are usually (but not always) temporary. Exerting extra effort for a few days or few weeks now will reward you with healthier crops going forward.


Resources for this article:
eHow- How to water plants in extreme heat
CBS news- Help your garden through a heat wave
Lohud.com - Coping with a garden in a heat wave

*DISCLAIMER: Before using any information contained in this blog entry, you are advised to do your own due diligence & research on the topic and/or consult with a qualified expert or professional.


Sunday, July 10, 2011

Famous Short Gardening Quotes & Sayings, Volume 1


Ken Druse
"When gardeners garden, it is not just plants that grow, but the gardeners themselves." - Ken Druse


"Confronted with the vision of a beautiful garden, we see something beautiful about ourselves." - Jeff Cox

William Cowper
"Gardening imparts an organic perspective on the passage of time." - William Cowper

"If you would have a lovely garden, you should live a lovely life." - Shaker saying


Joseph Joubert
"All gardeners live in beautiful places because they make them so." - Joseph Joubert

"Because a garden means constantly making choices, it offers almost limitless possibilities for surprise and satisfaction." - Jane Garmey
 

A. Pope
"All gardening is landscape painting." - Alexander Pope

"How deeply seated in the human heart is the liking for gardens and gardening." - Alexander Smith
  

Monty Don
"You do not need to know anything about a plant to know that it is beautiful." - Montagu Don

"Earthworms are the intestines of the soil." - Aristotle
 

Joseph Addison
"I value my garden more for being full of blackbirds than of cherries, and very frankly give them fruit for their songs." - Joseph Addison

"If you have a mind at peace, and a heart that cannot harden, go find a door that opens wide upon a lovely garden." - Author Unknown

Alfred Austin
"Exclusiveness in a garden is a mistake as great as it is in society." - Alfred Austin

"Poor indeed is the garden in which birds find no homes." - Abram L. Urban

William Blake
"The thankful receiver bears a plentiful harvest." - William Blake

Resource:
Our Paths In The Valley


Thursday, July 7, 2011

How-to Make a Plant Waterer From An Empty Cat Litter Container


Today I'm going to show you how you can make convenient garden waterers from used plastic cat litter containers. There are many benefits and few pitfalls when considering this alternative method of watering your vegetation.

Positives:

1) Cost effective. By only watering right around the roots of the plant, you are saving money on your water bill.

2) Helps reduce weed growth. Weeds will not grow as vigorously where they receive less water.

3) No need to un-coil and re-coil your hose reel, or manipulate its movement around the yard.

4) Great for keeping on stand-by. They are extremely handy when you need water on the spur of the moment, such as when you spot a starving plant at dusk.

5) Can help during times of drought when certain water restrictions are in place.

Negatives:

1) Not pretty. In addition, should also be kept out of site when not in use, otherwise may look tacky when kept within view. Empty cans may also blow around your yard when windy.

2) A bit heavy & bulky, therefore not recommended for children, elderly and some adults.

What you will need:

1) Obviously you will need a cat. Alternately, ask a cat-owning friend or family member to save their containers for you.

2) Used cat litter plastic container. Usually, these containers are sold in 14 or 20 pound containers, but occasionally you'll see them in smaller 10 lb versions (such as at Dollar General). Unless you're strong, I would recommend the 14 pound size as I will use in this demonstration (10 pounds doesn't hold enough water to be as effective).

3) Though you can use a hammer & sharp nail to make your holes, the easiest way is to use a drill. For best results, I prefer to drill many holes using smaller sized drill bits, rather than fewer holes with bigger drill bits. Water pouring out from larger holes may bend or damage sensitive or delicate plants.


Step-by-step guide:

Step 1: Rinse out the inside to get rid of any excess cat litter fragments.

Step 2: Prepare your waterer by cutting off the plastic product label.
Step 3: With cap on, drill 10 to 15 holes on top of the cap, spacing them apart as evenly as possible. You can experiment with fewer or more holes to suit your rate of sprinkle.
Step 4 (important): You will need to vent the container to help water pour out faster, smoother & more evenly. To do this, drill 3 more holes at the top of the handle. NOTE: Some water may pour from these holes when watering. To help avoid getting your hands wet, drill these holes closer to the cap as shown in my photo.
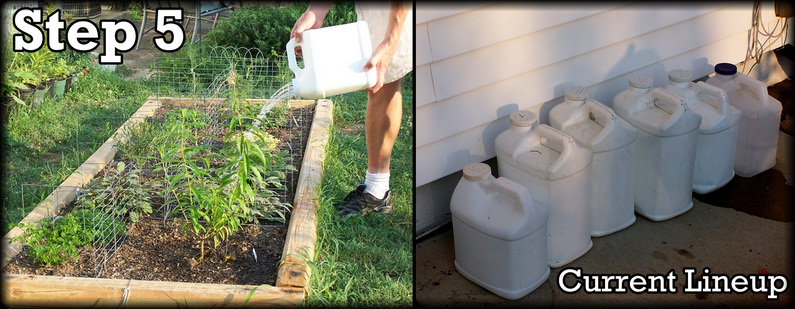
Step 5: Fill with water, transport to your destination, and begin pouring where needed.


NOTE: I keep several of these containers always filled with water (right now I have 6). I have a big back yard so I use a wheelbarrow to transport multiple containers to my destination.