Showing posts with label Vegetable Gardening. Show all posts

Tuesday, February 7, 2012

What To Do When Your Indoor Seeds Are Growing Much Faster Than Advertised?


This is my first year of growing seeds indoors, and I must admit I covered every angle of this process to perfection. I bought the right seeds, grow lights, heating mat etc... and have religiously followed many expert bloggers advice.

In fact I did too good of a job -- my seedlings are growing way too fast! After 10 days, they are where I thought they would be after one month.
Growth has been phenomenal and has exceeded my expectations.
My seedlings began emerging:
Cauliflower-2 days
Broccoli- 3 days
Tomato- 3 days
Lettuce- 3 days
Pepper- 4 days

After about 2 months, I was told I would need to transplant into bigger (3 X 3", or 4 X 4") pots, at which point I would be ready to place them outside in my greenhouse. According to plan, this would have occurred in late March.

However, it's looking like many of my seedlings will be ready for this process before the end of February.
Closer view of a variety of peppers and tomatoes.
A Chilling Thought

The thought of putting these plants outside in a greenhouse in late February is a little troublesome for me. In Virginia the average temperature still dips below freezing on most nights. Even in a greenhouse, this might put too much stress on the little fellas.
My Cauliflower's were the first to emerge, after just two days! They are already several inches high.
Thinking Ahead

For several weeks, my new plants will need a "half-way" house -- between the time they graduate from the seed tray to when they get a new temporary home in the greenhouse.

So I am already starting to plan in advance. Despite living in a small, crowded house with very little extra room, I have identified 6 spaces next to windows where I can place trays. Each tray fits 18 3X3" pots, which will cover 108 plants. 72 plants can go back under my grow lights.

This still leaves several dozen plants unaccounted for. Oh well, I'll have to cross that bridge when I get there.

Next year I will start my indoor seeds one month later ... you live and you learn.
 

Wednesday, February 1, 2012

New 2012 USDA Hardiness Zone Map Released - Changes Reflect Rising Temperatures Since Last Release

Updated once every several years to a few decades, the USDA has released an interactive GIS-based hardiness zone map for 2012. It is also available in static image form for slower connections.

Click image to view interactive link, or use links at the bottom of this post.
Gardeners beware ... the climate has changed over the last several decades and the government has reflected these changes with this new hardiness zone map. Most locations throughout the USA have remained the same or been notched up a half zone.

A half zone increase may not sound like much - it reflects a 5 degree change - but with first and last frost times so critical, one or two weeks could make a difference between plant life and death.

Stuck in-between zones and not sure which zone you belong to? No problem -- just type in your zip code and it will tell you.

Currently, the USDA has not printed any posters of this new 2012 map, but you can download state, regional and national maps in a variety of resolutions and print them yourself.

View Maps:

Interactive version for higher speed internet connections

Static version for slower internet connections


Thursday, January 19, 2012

FREE Seed Catalog List. 30 Companies That Will Mail You Their Latest Print Seed Catalogs Cost Free.

With experts and avid gardeners all ready to begin growing seeds indoors, it's time to get a game plan underway for your Spring garden. Browsing through catalogs is one of the finest ways to get great gardening ideas.

If you're like me, there's nothing like flipping through real-life magazines, newspapers and catalogs (it's just not the same in digital form!). That's why I still order print editions of my catalogs, and yes (in case you're wondering) I do still get my newspaper delivered to my house daily.

All of the following 30 links are verified to be working as of yesterday, January 19, 2012. Just fill out the requested information and these companies will send out a catalog at their earliest convenience. It's that simple.

NOTE: Where indicated, many of these companies also do offer a downloadable .PDF version (or other type of digital download) of the same catalog. Also keep in mind that some of these companies have not yet released their 2012 catalog, so make sure you don't request a 2011 version if you want a 2012.

DISCLAIMER: Unless otherwise stated, LushGreenVA neither personally endorses or opposes any of the following merchants. Please do your own due diligence if you intend to commit financially to these organizations.

THE LIST - FREE PRINT SEED CATALOGS:

Abundant Life Seeds (.PDF version also available)
Organic and biodynamic vegetable, flower, & herb seeds. Also garden supplies and tools.

Baker Creek Heirloom Seeds (.PDF version also available)
Pure heirloom, open-pollinated vegetable, flower, & herb seeds.

Botanical Interests (.PDF version also available)
Vegetable, flower, & herb seeds.

Bountiful Gardens
Heirloom, untreated and open-pollinated vegetable, flower, herb and other seeds.

Comstock Garden Seeds
Selling seeds for 200 years. Primarily Heirloom vegetable seeds, some flower & herb seeds.

Gurney's Seed & Nursery Co.
Popular company selling vegetable seeds & much more.

Harris Seeds
Since 1879, selling primarily vegetable seeds.

High Mowing Organic Seeds (.PDF version also available)
100% certified organic, non-GMO vegetable, flower, & herb seeds.

Irish Eyes Garden Seeds
Vegetable, flower, herb and other seeds, plus more.

John Scheepers Kitchen Garden Seeds
350 varieteies of vegetable, flower, & herb seeds.

Johnny's Selected Seeds
Vegetable, flower, and herb seeds.

Kitazawa Seed Co.  (.PDF version also available)
Specializing in over 250 Asian vegetable seed varieties.

neSeed
Selling vegetable, flower, & herb seeds in small or bulk quantities.

The Online Greenhouse
Some non-GMO and heirloom vegetable & flower Seeds, and other seed starting supplies.

Peaceful Valley Grow Organic
A section of organic vegetable and herb seeds, and open-pollinated flower seeds. Also a bunch of other stuff.

Richters (.PDF version also available)
Herb seeds, extracts, oils & more.

Seed Savers Exchange (.PDF version also available)
Non-profit organization dedicated to saving and sharing heirloom seeds. Vegetable, flower, herb seeds, and more.

Seeds of Change (.PDF version also available)
Organic vegetable, flower, and herb seeds. Also live plants, tools and supplies.

Select Seeds
Rare, choice heirloom flower and plant seeds, as well as a few herb seeds.

Southern Exposure Seed Exchange
My favorite, located here in Virginia. Specializing in mid-Atlantic seeds (zones 6-8) Huge and informative catalog full of vegetable, flower, & herb seeds.

Sow True Seeds (.PDF version also available - just click on catalog image!)
Vegetable, flower, and herb seeds. Open-pollinated/non-hybrid & untreated seeds featuring heirloom, organic & traditional varieties.

Territorial Seed Company (online version also available)
Family owned business selling vegetable, flower, and herb Seeds. Also live plants and garden supplies.

The Cook's Garden
Packed with seeds and live plants, including vegetables, annuals, perennials, herbs, garden-ready plants, gardening supplies and more.

Thompson & Morgan
Quality English seeds for over 150 years. Vegetable, herb, shrub and tree seeds + much more!

Totally Tomatoes (online version also available - see link near lower left)
Tomato, pepper and vegetable seeds, plus live plants, roots and berries.

Urban Farmer
Vegetable & herb seeds as well as Spring bulbs, and seed potatoes.

Veseys
Certified organic vegetable, flower, & herb seeds as well as bird feeders, tools and supplies.

Wild Garden Seed
Located in the Pacific northwest. Open-pollinated, untreated and organic vegetable & herbs seeds.

Willhite Seed Inc. (.PDF version also available)
In the seed business for 86 years. Vegetable as well as a few herb seeds.

Sunday, August 28, 2011

Funny Harvest: Mouse Doll Potato

I was harvesting my Red Norland potatoes the other day when I came across this hilarious looking potato.

It looks like 4 potatoes that were conjoined during the growth process.

There's a fat torso with a head and big ears attached. There's even a little tail where the stem was attached!

Trust me, there was no glue or tricks involved here - this is truly the way it came out of the ground.

My first thought was that it reminded me of Mr. Bean's teddy bear, but upon further review, it looks more like a mouse doll.
I think my potato (right) looks more like the mouse in the middle, rather than Mr. Bean's Teddy (left)
Seems like every year I pull something funny out of my garden. Last year it was this odd looking tomato.


NEW  LushGreenVA's aStore - powered by Amazon Clutter-free shopping for vegetable gardeners. Every product hand-picked and smartly categorized by me, H. Mikael - many are similar to one's I use myself, including: Composters, Raised beds, Greenhouses/Cold Frames, Rain Barrels, Rear-tine Tillers and Cultivators

Friday, August 26, 2011

Helping Caged Tomato Plants Survive A Tropical Storm Or Hurricane


With a Hurricane & Tropical Storm bearing upon millions of USA residents, it is sure to bring devastating winds and torrential rains to gardens across the region.

Any plant with a high center of gravity and dense vegetation will be vulnerable to severe damage. Tomato plants fit that description.

Damage to caged tomato plants can be minimized or completely avoided by taking the following steps today:


1. Cut off excess tomato plant growth above the top of the cage (as pictured above). If not removed, rain will make these branches and leaves top heavy and flop around in the wind - increasing the chances of plant collapse. NOTE: I realize this may mean sacrificing a bunch of young green tomatoes, but it's better to take one step back now in order to take two steps forward later.

1b. (Not pictured) Also trim any dead or dying leaves or other excess growth in the middle of the plant. Any extra weight must be reduced.

2. Using appropriate wood for wedges (I'll let you determine what's appropriate), hammer at least two wedges inside the tomato cage (each opposite side from one another) so as to hold and stabilize the cage firmly in place. NOTES: Try to use 4 foot (or longer) pieces of wood and hammer them into the ground at least 2 feet if possible. Also don't worry too much about killing your tomato roots. You're actually only affecting a small percentage of roots.

These are not foolproof methods of protecting your tomato plants from storm damage, but will increase your odds for survival. Much depends on your location, path of the storm, amount of rain and intensity of wind.

Good luck.


Tuesday, August 16, 2011

Habanero Harvest - The Fiery Truth About Making Your Own Hot Chili Powder


It's been a long time comin.' Last Saturday morning I finished my week long harvest of Habanero Peppers - my first of the season - and decided I'd try my hand at making habanero powder using my fairly new Nesco Food Dehydrator. So far, I've only used this machine to successfully dry herbs.

Before starting I knew what I was in for. Habaneros are the second HOTTEST chili pepper in the world (second only to the Ghost Pepper). This adds to the allure and challenge of making/eating such a potent pepper. Love it or hate it, Habaneros give me a rush unlike anything on this earth.

A little goes a long way, so this batch alone should take me through most of the winter. I will keep some in a small shaker and, like Mustard from hell, I will make mix my habanero powder into a half empty container of my favorite mustard. I might even try to sell some pure powder online.
Before placing in your dehydrator, wash and cut Habanero peppers into 1/2" slices
The dehydration process


With it's conveniently included recipe & instruction guide, I placed my cut habaneros (says to cut them in 1/2" slices) in the Nesco Food Dehydrator and turned it to 135 degrees. Though the drying time is said to be 3-20 hours for peppers, my batch was finished closer to the 20-hour range.

Harvest weight vs. dehydrated weight

Out of the 16 ounce harvest, I used about 14 ounces for dehydration (kept a few fresh ones for myself). After a day of dehydrating at 135 degrees - and then grinding into dust - I finished with just 3 ounces of powder. This means that 75 to 80 percent of my habanero pepper weight was moisture (water).

Just how much powder can one healthy habanero plant make in a season?

Out of curiosity I will be keeping a running tally of exactly how much powder a good habanero plant can produce in a general growing season (Zone 7).

Judging by this first harvest, I would estimate that each plant may produce 8-16 ounces of powder.

Though I will not be making powder from the majority of my habaneros, I can weigh my fresh harvest and - deducting 80% from that weight - determine a minimum seasonal powder yield. At season's end, I will report my findings and add an addendum to this blog post.
What I like about the Nesco Food Dehydrator is that it does a great job drying herbs, nuts, meats, fruits and of course vegetables at precise temperatures. This is important, because it enables your food to maintain valuable nutrition otherwise lost using a microwave or oven to dry your foods. In addition, the Nesco Food Dehydrator is expandable up to 12 trays! (I only used 5 on this occasion) - perfect for large drying projects. If you're worried about small herbs or food falling through the cracks, you can buy specialized plastic screens to help minimize loss.
Cautiously painful experience

Trust me, habanero pepper juice & powder WILL get on your hands (and eventually everywhere else) throughout this whole process. At 30 times the calibur of jalapeno peppers, just touching a habanero can be enough to set off extreme bodily reactions for some folks.

Dehydrating in an open space, such as the kitchen, can bring tears to other household members.


Breathing near the dust of newly ground-up habaneros can literally take your breathe away for a few moments - or set off allergic-type reactions.

Cleaning or handling utensils/dishes etc. used to make habanero powder may leave residue on your hands - only to realize it hours later when you wipe your face (or even worse, when you use the bathroom).
Final tally - about 3 oz.
My personal recommendations for making habanero powder:

1) Wash your hands often and thoroughly when handling habaneros - this includes after harvesting, cutting, working with the dehydrator and food grinder, and cleaning afterwards. If possible, wash your hands by using concentrated dish cleaning soap or something such as heavy duty garage hand-cleaner. Do not use just plain water.

2) Since this is such cautious and delicate process, I would recommend waiting long enough to make ONE HUGE batch - rather than making several smaller batches throughout the season. This can be done by freezing peppers until you're ready. Peppers do not have to be blanched to be frozen, and while peppers lose their crunch when put in a freezer - this does not matter for dehydration purposes.

Further study: Nesco Food Dehydrator


Saturday, August 6, 2011

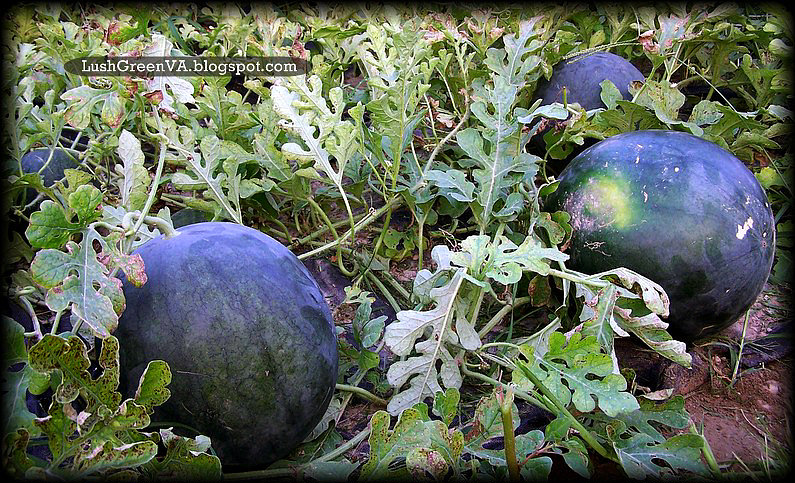
When Should You Harvest Your Sugar Baby Watermelons?


Just a few of my six Sugar Baby's currently growing from 2 plants


While an experienced melon grower has little problem determining when to harvest their sugar baby watermelons, the rest of us may need a little help to get it right.

Here are 6 ways to determine the right time to harvest and enjoy your sugar baby watermelons:
  1. Follow instructions and harvest when you're supposed to. On a calender, note and keep track of the maturity date. This is usually listed on the back of your seed packet. If you don't know your specific type of sugar baby watermelon, most are ready for harvest around 80 days (give or take a week).
  2. Check the curly tendril that attaches your sugar baby watermelon to the stem. If it is still green, then it is very much alive, healthy and growing and NOT ready for harvest. If the tendril is brown and dry, it may be prime for picking. NOTE: Start paying close attention daily as it begins turning from green to brown. This will ensure peak ripeness.
  3. Thump it with your fingers. This method works best with experience, but can give you valuable clues. When ripe, the sound will be deeper and more low-pitched than younger melons.
  4. Look at the skin color and feel it's texture. When harvest nears, the color gradually turns from bright green to a slightly duller hue and the texture starts to feel somewhat rough. These methods are also born from experience but are an excellent determining factor for ripeness.
  5. Test it with your fingernail. When ripe, the skin of the sugar baby watermelon will be more difficult to indent with your fingernails.
  6. Check the underside of your watermelon. If the belly is creamy-white (for seeded varieties) or golden yellow (for seedless), it may right for picking.

Notice the tendril attached to the stems on 2 of my melons. They are not brown and dry yet - therefore they could use more time
Final words

As your sugar baby watermelons get close to harvest, reduce or stop watering completely. This prevents hollow craters inside the melon, and promotes higher sugar content - resulting in better taste.

When brought inside, store your melons between 50 and 60 degrees.


DISCLAIMER: Before using any information contained in this blog entry, you are advised to do your own due diligence and research on the topic and/or consult with a qualified expert or professional.


Wednesday, August 3, 2011

Last Chance Vegetable Plants (Zone 7)


Hard to believe it's August 4th already, but if you live in USA hardiness planting zone-7, you can still plant seeds now for harvest before first frost, presumably sometime later in October.
As I explained in this post, plants listed here are based on information primarily for Zone 7 Virginia gardeners, though this reference is probably valid for MOST gardeners located in hardiness zone 7 throughout the United States.

What You Can Still Plant (the sooner the better):
Remember, just because I don't mention it here, it doesn't mean it can't be planted. Do your own research -- you may be surprise what you may still plant.

Extending the growing season

Many keen and avid gardeners can extend the growing season by utilizing plant survival techniques, allowing them to plant later and harvest later.

These include covering vegetation with tarps or other covers to prevent frost damage, watering before sunset to help trap warm air near the soil surface, or use cold frames (mini-greenhouses)

Adjacent Zone's 6 and 8

Because this post focuses specifically on Zone 7 (mid-Atlantic to be more precise), I can't speak for hardiness zones 6 (cooler) or 8 (warmer).

Common sense would say it may be getting late in zone 6 for the plants discussed here, and you may have more time in zone 8, but please do your own research.

Final Word

Do you know any other vegetable (or herb) that can still be planted in Zone 7 ? Share a comment and let me know.


Sunday, July 31, 2011

What To Do When Squash Bugs Attack Your Pumpkin Patch?


I am only growing one pumpkin plant this year, so it's imperative I take special care of it. Though it's been a little "slow out of the gate," it's shown good signs of life during the last week or so. Unfortunately that "life" is not just plant matter, but bugs ... big bugs ... I'm talking about the dreaded Squash Bug!

In recent days I have seen & identified a few of these creatures, and today when I saw two sets of eggs - I had had enough. It's time for action. Though I'm 99% organic, the ONLY product I ever use is GardenTech's Sevin-5 Dust. I use this powder on rare occasions, like today (16-32 ounces seems to last me a year). According to the label, it's supposed to kill Squash Bugs (I'll post an addendum on this post later to let you know the results).

Last evening I studied these bugs - as they relate to pumpkins - and am further devising a game plan to rid these monsters before they put a kibosh to my 2011 Halloween vegetation. So far about 80% of my plant is in good condition.
Squash bug damage on a pumpkin plant leaf
The most difficult garden pest?

Many people consider the squash bug the most frustrating and difficult of all garden pests. For one, there appears to be no universal solution that works for everyone. Secondly, they overwinter extremely well and can return year after year (getting worse each growing season), making it sometimes impossible to ever successfully grow squash, pumpkins or other melons again.

Like any pest that multiplies rapidly, early-season or early-plant-stage intervention appears to be the best defense against squash bug infestation & damage.

Human versus Squash Bug

Unfortunately, manual control may be your best & most effective remedy. Removing each bug by hand (one at a time) and crushing their eggs can help control your local squash bug population, but must be performed on a regular basis to be most effective. Since eggs take at least a week to hatch, egg detection can be performed once-a-week.

Mulch and other debris must be kept to a minimum. Squash bugs love to hide, and removing any mulch or other garden debris left lying around keeps them from wanting to hang around.

This "hiding" tendency amongst squash bugs can also be used to your advantage. Laying boards or wood around the base of your pumpkins makes a perfect overnight hangout for squash bugs. In the morning, flip the wood over, and you're likely to see many squash bugs huddled conveniently together, perfectly queued for mass extermination.

Eggs (& Closeup) As Laid On Leaf Of a Pumpkin Plant
The Bitter Truth - You May Need Chemical Intervention


Organic methods of controlling the Squash Bug appear to be limited. Yes I found a few "folk remedies" by some wise old gardeners swearing upon their success, and Neem Oil seems to work for some. I did run across this website, which suggested the use of Diatomaceous earth/pyrethrins applications around the base of the plant (the website says it's allowable in Certified Organic vegetable production). If anyone else wants to try this, let me know of your results.

If you're going to use insecticides, look for esfenvalerate, permethrin, or carbaryl as the main active ingredient and be sure to spray the under-side of the leaves, as this is where squash bugs do much of their damage.

As I mentioned earlier in this article, I use Sevin-5 on rare occasions. Squash bugs are listed as one of 65+ bugs it's said to kill.


Thursday, July 21, 2011

Extreme Heat Vegetable Gardening: 11 Ways To Keep Your Garden Lush Green


Though it's been hotter than normal yet once again virtually all summer here in the mid-Atlantic states, we've yet to hit triple-digits on a recurring basis -- until now. The weather forecast calls for 100-103 degrees in my area today, Friday & Saturday.

My garden has held up extremely well so far this year. Except for the dying browning leaves of the potato plants (which is normal in any year/climate), my garden is maintaining its lush green hue.

But now it's time to get serious - to show what man vs. nature can do.

First & foremost, do not pay attention to the 'heat index' - rather focus your attention only on the temperature. The heat index measures a combination of temperature and humidity, and indicates how it feels to us humans. Since humidity is actually moisture content in the air, plants are not as negatively affected by it as humans. In fact, one can argue that plants (especially those tropical in nature - such as tomatoes & peppers) may actually benefit from the natural wetness humidity brings to the air. So even though we humans may suffer more when it's hot & humid as opposed to hot & dry, plants react opposite.

Develop a good watering 'game plan.'

1) Prioritize which plants need to be watered more & most frequently. Pay special attention to wilting or dying plants, and vegetation that naturally relies on more watering, such as melons, tomatoes etc. New plants also need more water than established ones because they are still trying to grow & establish roots needed for long-term survival.


2) During the heat wave, watering should only be attempted early in the morning or later in the evening. Mid-day watering may cause the moisture to evaporate more quickly and/or result in wilting of leaves. Generally speaking, try not to water between the hours of 10am & 7pm.

3) Before watering, allow the sun-heated water already inside the hose to exit before spraying in & around your vegetation. The plants are already stressed and pouring 150 degree water on them cannot be good. NOTE: I have recently read stories of people pouring ice cubes around their plants. This, too, actually stresses the plants rather than help them. Do not do this.

4) Using a hoe, self-irrigate or create temporary water flow channels as I show in this post. If you happen to get a rain shower, this helps direct excess water where it's most needed.

5) To also help prevent water run-off on dry hard dirt, loosen soil with a hoe by tilling the radius from between 6 to 18 inches from the plant stem (tilling too close may damage roots). This helps allow the ground to better soak up more moisture, more deeply. Water run-off can also be prevented by watering less more often, rather than watering more less often. In other words, water for 5 minutes twice a day rather than for 10 minutes once.

6) Since water on leaves should be avoided, so too should be the use of sprinklers. During hot & arid times, resort to watering with containers (like I explain in this post) or use a hand-held hose. Each method allows you to water only where it's most needed -- at or around the base of the plant. Better yet is the use of a drip irrigation system or a soaker hose. Each waters more slowly right at the soil level, preventing evaporation.

Additional tips.

1) Don't use fertilizer until after the heat wave subsides. Since fertilizer promotes new growth, it also boosts the need for more water.

2) Adding mulch around the plant is more important than ever. One or two inches of mulch helps retain water moisture & prevent the soil from drying out as fast.

3) Don't be afraid to prune back plants that appear to be suffering from the heat wave. However, don't attempt to prune if you're only trying to stimulate new growth - plants challenged by the heatwave will not benefit.

4) Removing weeds is especially important during these scorching, arid times. Each ounce of water is more valuable than ever, and sharing with weeds should not be an option.

5) Avoid spraying your plants with products that contain oil. The extreme heat combined with oil residue left behind may result in leaf burn.

Final word
Use this heat to take a much needed break from gardening -- only harvest & water as needed during the early or late day hours. Consider your time indoors (in air conditioning) like a mini-vacation, or use this extra free time planning your second-half vegetable garden. Lettuce, broccoli, cauliflower (among others) can still be planted going forward in most parts of the country.

And remember, heat waves are usually (but not always) temporary. Exerting extra effort for a few days or few weeks now will reward you with healthier crops going forward.


Resources for this article:
eHow- How to water plants in extreme heat
CBS news- Help your garden through a heat wave
Lohud.com - Coping with a garden in a heat wave

*DISCLAIMER: Before using any information contained in this blog entry, you are advised to do your own due diligence & research on the topic and/or consult with a qualified expert or professional.


Sunday, July 17, 2011

Spiny Pigweed: The Name says It All About This Filthy Weed


As I've gotten older & wiser, I've also become a firm believer that there is a purpose and reason for the existence of virtually every living thing on this earth. Everything is designed to work in unison as part of this large diverse eco-system.

But then came spiny pigweed, also known as spiny amaranth.
When this ugly, spiny, fast-growing, even faster spreading, invasive weed started showing up all around my garden this year -- I obviously wanted to know more about it from a weed control standpoint. But I also was driven to find out what its purpose was here on this earth.

Well, believe it or not, this plant is being utilized today throughout the world to treat numerous medical conditions. I'll get more into that later in this post. But first, let's take a closer look at spiny pigweed.

What is this weed?

Spiny Pigweed is native to America and is frequently found in bare ground areas of pastures where the ground is compacted, but can also be found in agricultural garden areas. This may explain why this weed primarily shows up in my manure-laden vegetable garden in-between rows where I tend to walk more often and compact the dirt (but it does also show up between and around my plants as well).
Growing fast, spiny pigweed should be removed as it first appears. It is important to identify and eliminate this 'annual' early during the growing season. If allowed to go to seed early, it has a tendency to spread like a plague & grow all over the garden. If not removed, it quickly grows to several feet or more in height, and produces 100,000 or more seeds per plant (seeds mature about 4 weeks after flowering). These seeds will continuously germinate throughout the summer months, spreading like wildfire with each successive rainfall. Furthermore, they tolerate drought extremely well.

Unfortunately I was not aggressive enough with spiny pigweed early-on this season, partly due to lack of education about the plant. Now I'm stuck spotting & removing these weeds on a daily basis, adding to all the other obligations in maintaining a fairly large garden. Next year I will know better.

Removing Spiny Pigweed

This nasty looking weed cannot be pulled out of the ground with your hand (even when using gloves), as it features numerous 5-10 mm thorny spines, capable of penetrating the toughest leather. You must use an appropriate tool to effectively dig the roots out of the ground.

Removing spiny pigweed is especially troublesome when it grows right next to your "good" vegetation. If this occurs you can either attempt a risky operation to remove the weed (possibly damaging the roots of your good plant), or just allow the weed to share the space while continuously cutting it back near ground level.


After removal from the ground, spiny pigweed must be bagged and removed from the garden premises to prevent existing seeds from scattering.
Closeup of stem
Control

If your garden methods are organic, your options to control this weed are minimal. Vinegar, at 15 to 20% concentration (regular household vinegar is usually about 5%) may be effective, but care & further research should be undertaken to make sure the vinegar does not harm your 'good' plants or soil. All spiny pigweed plants should be removed before flowering & seeding.

The good news is that spiny pigweed is not a perennial. However, if they're invading your garden this growing season, their scattered seeds will likely result in another visit next year. Early prevention in 2012 will be your best defense.

Herbicides can be used to kill existing spiny pigweed plants, but should be applied early in growth stage -- preferably at 2 inches in height or less, but certainly under 8 inches. At this stage of growth, success rate can be as high as 80-90%. Atrazine, Dopont Upbeet, Glyphosate, Gramoxone, Dicamba (among others) may be effective herbicides. If you wish to attack and kill spiny pigweed before they emerge from the ground, Oryzalin, Trifluralin or Pendimenthalin may be your best bets.

For a detailed overview of helpful herbicides, click here, or read this PDF document.
Flowering end of branch where some of the plants over 100,000 seeds eventually form.
Medicinal benefits. Yes there appear to be many.

Though not anywhere near renowned as, say, Echinacea for it's ability to prevent or cure illnesses, spiny pigweed is used in many parts of the world (mostly in Asian & African countries) to treat numerous medical conditions, including:
  • Mouth ulcers
  • Vaginal discharges
  • Excess menstrual bleeding
  • Bloody noses
  • Wounds
  • Internal bleeding
  • Diarrhea
  • Snake Bites
  • Fevers
  • Dysentery
  • Urinary conditions
  • Gonorrhea
  • Eczema
  • Colic
  • Menorrhagia
  • Breathing difficulties
  • Earache
  • Inducing abortion
  • Burns
  • Boils
  • Ophthalmia
  • as a diuretic
Closeup of spiny pigweed leaf, usually 1-2" in length.
Edible, if you so desire

The good news is that spiny pigweed is not poisonous to humans (though it is toxic to many animals) & can be safely consumed. In addition, it has extremely high nutritional value, and can be fried, cooked or steamed. The seed can also be ground into healthy flour.

Now the bad news. This plant is popularly known as famine food. Though eaten regularly in a few suspect third world countries, its bitter & otherwise less desirable taste (along with its many spines) makes this plant a food of "last resort" in most worldwide locations. It's primarily only used when other vegetables become unavailable, such as in times of drought (it's a fairly drought tolerant plant).

Still, if you're ever lost in the woods or wilderness and come across this plant -- it can help keep you alive.

Other uses

Dyes. Ash from the plant has been used in Cambodia to create grey colored dye for cloth. Green & yellow dyes are also reported to be made from parts of the whole plant.

Final words

This may be the longest non-scientific piece written on this horrific weed ... well, someone had to do it! Consider yourself educated.

After reading and researching this piece I now have a new found respect for spiny pigweed. It does have "some" purpose, but I still loathe it anywhere in my yard.

*DISCLAIMER: Before using any information contained in this blog entry, you are advised to do your own due diligence & research on the topic and/or consult with a qualified expert or professional.


Monday, July 4, 2011

Commemorating July 4th: A Look Back At Colonial Vegetable Gardening


Thomas Jefferson's Monticello vegetable garden
With a seemingly endless (and possibly permanent?) poor economy in the USA, home vegetable gardening has seen a renaissance in recent times. With July 4th upon us once again, I thought I'd take a look back at 18th century vegetable gardening in America, specifically around the time of 1776 when America gained its Independence.

Naturally grumpy about their vegetables


First we must understand that a good majority of the population was comprised of first or second generation English settlers. With their roots still firmly entwined in English tradition, these people were not big vegetable eaters to begin with. This may be due to the cooler, more cloudy and damp weather typical for a United Kingdom summer. Meat & grain were the two foods of highest preference for most early settlers.

Thus, in Colonial America, private vegetable gardens were not as prevalent as you may assume. One study of 18th century properties for sale in the Williamsburg, Virginia area determined that only around 20% mentioned gardens as a "selling point." Another early study found that when Colonials visited markets, just 15% of all goods purchased were vegetables, accounted for just 3% of total money spent.
Small kitchen garden, Williamsburg, Virginia
Growing vegetables ... no small feat

Though many did attempt to grow vegetables in some form, few found their niche or were very good at it. Vegetable gardening wasn't as simple as just having an idea and doing it. There were a lot of pitfalls and obstacles to overcome.

Any weather-wise gardener knows a minimum of one inch of rain is needed weekly to maintain a good growing garden. Thus, water was a huge stumbling block for most people with vegetable gardening aspirations. Though average rainfall was fairly abundant in the states comprising Colonial America, summer droughts (June thru August) were still extremely common. Some summers saw very little rainfall. Vegetable gardening could not be relied upon as a reliable source of consistent food.
Morristown National Historical Park
If you did not own your own slaves (most households did not), transporting, storing and distributing water to a garden was often-times a back breaking and exhausting experience -- seemingly endless when nature did not provide enough of its own nutrition. Often fresh water had to be carried one bucket at a time from a well or nearby stream or river. All this was enough to discourage many from growing & operating their own garden.

Animal & manpower

Tilling and breaking up the soil was another daunting task. This required the use of a horse or donkey to pull the tilling equipment along the rows or furrows, as well as manpower to help guide the tillers along a proper path.

As for gardening hand tools, not much has changed - Colonial Americans used antiquated yet effective versions of shovels, hoes, pitchforks etc... These tools were not cheap or readily available however. Most were made by local craftsmen, but some specialized equipment needed to be imported from Europe. All means were taken to ensure that your tools lasted a lifetime. If the handle from a shovel broke, for instance, rather than go to Home Depot & buy a whole new shovel, you would cut a small tree down, manually shape and cut it to the desired dimensions and find some means of attaching it to the shovel head.
Typical colonial vegetable garden configuration
Colonial gardening - a woman's job

Long before the women's liberation movement of the 1970's (about 200 years before), if you did not own slaves, women & children of the Colonial era were primarily responsible for keeping their homes and yards tidy, clothes washed, and their household well fed (just to name a few). They were also in charge of tending to the garden. This included planting seeds, weeding, watering, harvesting and all the other tasks associated with growing your own vegetables.

What foods did colonial Americans grow?


The types of food grown in colonial vegetable gardens were not too different than what is seen in today's modern gardens. Major differences were the abundant variety of vegetables grown (today's gardeners may focus on fewer groups), and the versions of each (unusual colored or shaped squash for example).

Above the ground, growing corn was extremely popular. Squash, pumpkins, lettuce, cabbage, peas, beans & leeks were also commonly seen. In ground vegetables included carrots, potatoes, radishes, turnips, onions & parsnips. Less popular but also grown were cauliflower, celery & artichokes.
Garden at George Washington's Birthplace, Westmoreland, Virginia
Herbs

Herbs were also planted amongst the vegetables. Like today, many herbs were used as food flavorings. Due to fewer available doctors or drugs, herbs were also used medicinally to treat minor ailments, wounds and abrasions. They were incorporated as fabric dyes, breath fresheners, potpourri, pest repellents, cosmetically and as deodorants or fragrances.

Final word

There was no "right" way of planning your garden. However, a typical colonial vegetable garden consisted of four squares or rectangles bisected by walkways. Walkways were frequently lined with stones found in the ground locally, and trellises made with sticks found in nearby woods. Many people planted fruit trees or vines around the edges or adjacent to this garden plot.

Resources for this article:
Kitchen Gardens in Colonial Virginia
eHow- Typical Colonial Vegetable Garden
eHow- Colonial Herb Gardens