Showing posts with label How-to. Show all posts

Wednesday, November 2, 2011

How To Make A Composter Tumbler From A Plastic Trash Can (In Less Than 30 Minutes)


You can buy a decent medium to large composter/tumbler for around $100 or more from your local hardware store or an online retailer such as on Amazon.Or, for less than $20, you can easily make one yourself today!

To start and complete your composter tumbler, all you need are the following:

  • Less than 30 minutes of your time.
  • Any size ROUND plastic trash can with a SECURE lid ("round" and "secure lids" are important because in order to mix contents, you will need to roll the container on the ground without having the top pop off).
  • A decent drill with a 1/4" to 1" size drill bit (I do not recommend holes larger than 1" - especially if you're adding kitchen waste - since debris may fall out of the holes).

Steps 1,2 and 3 - Drilling Holes

Drill holes on the top, side, and bottom of your trash can (in any order). This is actually fast and effortless work. I was surprised how easily the drill poked through the plastic - just like a hot knife through butter.


Making your own composter tumbler is not rocket science, so there is no "right" amount of holes - just use your best judgement & don't be bashful (airflow is essential, so you can't go wrong with too many holes). NOTE: The larger the size of your drill bit, fewer holes are necessary.

That's it. Your composter is finished.

Steps 4 and 5 - Adding and Maintaining Your Compost

In a future post, I will explain in more detail the basics of composting (in the meantime you can read this guide). For now, simply add your yard or kitchen debris, always making sure your compost never gets too dry or too wet.

From time-to-time, mix your compostables by laying the composter on its side and rolling it around on the ground a bit.

Congratulations. In several weeks or a few months you'll have the perfect garden food.

If all of this sounds like too much work, or you don't have a drill etc..., you can always buy one. Composting tumblers, such as these,are amazingly cheap and practical.


Friday, August 26, 2011

Helping Caged Tomato Plants Survive A Tropical Storm Or Hurricane


With a Hurricane & Tropical Storm bearing upon millions of USA residents, it is sure to bring devastating winds and torrential rains to gardens across the region.

Any plant with a high center of gravity and dense vegetation will be vulnerable to severe damage. Tomato plants fit that description.

Damage to caged tomato plants can be minimized or completely avoided by taking the following steps today:


1. Cut off excess tomato plant growth above the top of the cage (as pictured above). If not removed, rain will make these branches and leaves top heavy and flop around in the wind - increasing the chances of plant collapse. NOTE: I realize this may mean sacrificing a bunch of young green tomatoes, but it's better to take one step back now in order to take two steps forward later.

1b. (Not pictured) Also trim any dead or dying leaves or other excess growth in the middle of the plant. Any extra weight must be reduced.

2. Using appropriate wood for wedges (I'll let you determine what's appropriate), hammer at least two wedges inside the tomato cage (each opposite side from one another) so as to hold and stabilize the cage firmly in place. NOTES: Try to use 4 foot (or longer) pieces of wood and hammer them into the ground at least 2 feet if possible. Also don't worry too much about killing your tomato roots. You're actually only affecting a small percentage of roots.

These are not foolproof methods of protecting your tomato plants from storm damage, but will increase your odds for survival. Much depends on your location, path of the storm, amount of rain and intensity of wind.

Good luck.


Tuesday, August 16, 2011

Habanero Harvest - The Fiery Truth About Making Your Own Hot Chili Powder


It's been a long time comin.' Last Saturday morning I finished my week long harvest of Habanero Peppers - my first of the season - and decided I'd try my hand at making habanero powder using my fairly new Nesco Food Dehydrator. So far, I've only used this machine to successfully dry herbs.

Before starting I knew what I was in for. Habaneros are the second HOTTEST chili pepper in the world (second only to the Ghost Pepper). This adds to the allure and challenge of making/eating such a potent pepper. Love it or hate it, Habaneros give me a rush unlike anything on this earth.

A little goes a long way, so this batch alone should take me through most of the winter. I will keep some in a small shaker and, like Mustard from hell, I will make mix my habanero powder into a half empty container of my favorite mustard. I might even try to sell some pure powder online.
Before placing in your dehydrator, wash and cut Habanero peppers into 1/2" slices
The dehydration process


With it's conveniently included recipe & instruction guide, I placed my cut habaneros (says to cut them in 1/2" slices) in the Nesco Food Dehydrator and turned it to 135 degrees. Though the drying time is said to be 3-20 hours for peppers, my batch was finished closer to the 20-hour range.

Harvest weight vs. dehydrated weight

Out of the 16 ounce harvest, I used about 14 ounces for dehydration (kept a few fresh ones for myself). After a day of dehydrating at 135 degrees - and then grinding into dust - I finished with just 3 ounces of powder. This means that 75 to 80 percent of my habanero pepper weight was moisture (water).

Just how much powder can one healthy habanero plant make in a season?

Out of curiosity I will be keeping a running tally of exactly how much powder a good habanero plant can produce in a general growing season (Zone 7).

Judging by this first harvest, I would estimate that each plant may produce 8-16 ounces of powder.

Though I will not be making powder from the majority of my habaneros, I can weigh my fresh harvest and - deducting 80% from that weight - determine a minimum seasonal powder yield. At season's end, I will report my findings and add an addendum to this blog post.
What I like about the Nesco Food Dehydrator is that it does a great job drying herbs, nuts, meats, fruits and of course vegetables at precise temperatures. This is important, because it enables your food to maintain valuable nutrition otherwise lost using a microwave or oven to dry your foods. In addition, the Nesco Food Dehydrator is expandable up to 12 trays! (I only used 5 on this occasion) - perfect for large drying projects. If you're worried about small herbs or food falling through the cracks, you can buy specialized plastic screens to help minimize loss.
Cautiously painful experience

Trust me, habanero pepper juice & powder WILL get on your hands (and eventually everywhere else) throughout this whole process. At 30 times the calibur of jalapeno peppers, just touching a habanero can be enough to set off extreme bodily reactions for some folks.

Dehydrating in an open space, such as the kitchen, can bring tears to other household members.


Breathing near the dust of newly ground-up habaneros can literally take your breathe away for a few moments - or set off allergic-type reactions.

Cleaning or handling utensils/dishes etc. used to make habanero powder may leave residue on your hands - only to realize it hours later when you wipe your face (or even worse, when you use the bathroom).
Final tally - about 3 oz.
My personal recommendations for making habanero powder:

1) Wash your hands often and thoroughly when handling habaneros - this includes after harvesting, cutting, working with the dehydrator and food grinder, and cleaning afterwards. If possible, wash your hands by using concentrated dish cleaning soap or something such as heavy duty garage hand-cleaner. Do not use just plain water.

2) Since this is such cautious and delicate process, I would recommend waiting long enough to make ONE HUGE batch - rather than making several smaller batches throughout the season. This can be done by freezing peppers until you're ready. Peppers do not have to be blanched to be frozen, and while peppers lose their crunch when put in a freezer - this does not matter for dehydration purposes.

Further study: Nesco Food Dehydrator


Monday, August 8, 2011

Landscaping Using Your Own Garden Rocks


After tilling, thousands of new rocks are unearthed in my garden


If your garden is full of small (or big) rocks, don't get mad -- use them to your advantage.

This year I decided that after each ground tilling session (about once a month), that I would take time to walk through, collect and store all the newly unearthed rocks from my garden.

These will be used when the weather cools for landscaping around the yard.

With the garden freshly tilled the day before (and ready for Fall vegetable seed planting), yesterday was "rock picking-up day."

My personal method of collecting and storing rocks

Nabber
If you choose, the most effective way to collect the most rocks is to get on your knees and pick up the rocks as you crawl around. Another method is to bend, stoop and pick up the rocks but this is harder on your back and joints.

However, I personally prefer to use a nabber (pictured, above right - click image for more info). This allows me to nearly effortlessly collect rocks without any bending or much bodily stress. But even this device isn't perfect -- after a while, the nabber does strain your hands and wrists a little, so I wouldn't recommend this device if you have arthritis or weak hands/wrists.
Before beginning, I place numerous empty plant containers at various points equally spaced apart (image 1, above). This ensures that all containers are merely a nabber reach away - reducing unnecessary walking around.

Decide what size rocks you want to collect. For me, the rocks have to be the size of a quarter or bigger.

Next you simply use your nabber to pick up your rocks (image 2a), and place them in the closest container you see (image 2b). Walk around and collect rocks from the entire area until you're finished.
When you're done collecting, empty each container (image 3a) into your transport of choice - in my case, a wheelbarrow (image 3b).

Transfer and dump your load (image 4) to a collection pile somewhere around your yard.

Keep repeating every time after tilling, or in places where you have used your hoe. Rocks seem to unearth all of the time.
Your rocks can be used anywhere. Here I've used them to circle plants.
If you have a fairly large garden and lots of rocks - as I do - each year should yield enough rocks for several large landscaping projects. If your garden is smaller with fewer rocks, it may take years to collect enough rocks to do anything significant. But it's all worth it.

Final words

Get in the habit of keeping a bucket for rocks near your garden at all times. Rocks have a strange way of "just appearing," and gathering them as you go expedites your collection efforts.

HINT: The best time to pick up rocks is after it rains and dries off a bit. The rain cleans the dirt off the rocks and makes the mud darker -- the resulting contrast makes seeing the rocks much easier

SUGGESTION: Got children around? Wanna get them involved around the garden? Consider offering a child some monetary or other reward to collect the rocks. You can pay them by the bucket-full, by weight, or however you choose.


Sunday, July 31, 2011

What To Do When Squash Bugs Attack Your Pumpkin Patch?


I am only growing one pumpkin plant this year, so it's imperative I take special care of it. Though it's been a little "slow out of the gate," it's shown good signs of life during the last week or so. Unfortunately that "life" is not just plant matter, but bugs ... big bugs ... I'm talking about the dreaded Squash Bug!

In recent days I have seen & identified a few of these creatures, and today when I saw two sets of eggs - I had had enough. It's time for action. Though I'm 99% organic, the ONLY product I ever use is GardenTech's Sevin-5 Dust. I use this powder on rare occasions, like today (16-32 ounces seems to last me a year). According to the label, it's supposed to kill Squash Bugs (I'll post an addendum on this post later to let you know the results).

Last evening I studied these bugs - as they relate to pumpkins - and am further devising a game plan to rid these monsters before they put a kibosh to my 2011 Halloween vegetation. So far about 80% of my plant is in good condition.
Squash bug damage on a pumpkin plant leaf
The most difficult garden pest?

Many people consider the squash bug the most frustrating and difficult of all garden pests. For one, there appears to be no universal solution that works for everyone. Secondly, they overwinter extremely well and can return year after year (getting worse each growing season), making it sometimes impossible to ever successfully grow squash, pumpkins or other melons again.

Like any pest that multiplies rapidly, early-season or early-plant-stage intervention appears to be the best defense against squash bug infestation & damage.

Human versus Squash Bug

Unfortunately, manual control may be your best & most effective remedy. Removing each bug by hand (one at a time) and crushing their eggs can help control your local squash bug population, but must be performed on a regular basis to be most effective. Since eggs take at least a week to hatch, egg detection can be performed once-a-week.

Mulch and other debris must be kept to a minimum. Squash bugs love to hide, and removing any mulch or other garden debris left lying around keeps them from wanting to hang around.

This "hiding" tendency amongst squash bugs can also be used to your advantage. Laying boards or wood around the base of your pumpkins makes a perfect overnight hangout for squash bugs. In the morning, flip the wood over, and you're likely to see many squash bugs huddled conveniently together, perfectly queued for mass extermination.

Eggs (& Closeup) As Laid On Leaf Of a Pumpkin Plant
The Bitter Truth - You May Need Chemical Intervention


Organic methods of controlling the Squash Bug appear to be limited. Yes I found a few "folk remedies" by some wise old gardeners swearing upon their success, and Neem Oil seems to work for some. I did run across this website, which suggested the use of Diatomaceous earth/pyrethrins applications around the base of the plant (the website says it's allowable in Certified Organic vegetable production). If anyone else wants to try this, let me know of your results.

If you're going to use insecticides, look for esfenvalerate, permethrin, or carbaryl as the main active ingredient and be sure to spray the under-side of the leaves, as this is where squash bugs do much of their damage.

As I mentioned earlier in this article, I use Sevin-5 on rare occasions. Squash bugs are listed as one of 65+ bugs it's said to kill.


Thursday, July 21, 2011

Extreme Heat Vegetable Gardening: 11 Ways To Keep Your Garden Lush Green


Though it's been hotter than normal yet once again virtually all summer here in the mid-Atlantic states, we've yet to hit triple-digits on a recurring basis -- until now. The weather forecast calls for 100-103 degrees in my area today, Friday & Saturday.

My garden has held up extremely well so far this year. Except for the dying browning leaves of the potato plants (which is normal in any year/climate), my garden is maintaining its lush green hue.

But now it's time to get serious - to show what man vs. nature can do.

First & foremost, do not pay attention to the 'heat index' - rather focus your attention only on the temperature. The heat index measures a combination of temperature and humidity, and indicates how it feels to us humans. Since humidity is actually moisture content in the air, plants are not as negatively affected by it as humans. In fact, one can argue that plants (especially those tropical in nature - such as tomatoes & peppers) may actually benefit from the natural wetness humidity brings to the air. So even though we humans may suffer more when it's hot & humid as opposed to hot & dry, plants react opposite.

Develop a good watering 'game plan.'

1) Prioritize which plants need to be watered more & most frequently. Pay special attention to wilting or dying plants, and vegetation that naturally relies on more watering, such as melons, tomatoes etc. New plants also need more water than established ones because they are still trying to grow & establish roots needed for long-term survival.


2) During the heat wave, watering should only be attempted early in the morning or later in the evening. Mid-day watering may cause the moisture to evaporate more quickly and/or result in wilting of leaves. Generally speaking, try not to water between the hours of 10am & 7pm.

3) Before watering, allow the sun-heated water already inside the hose to exit before spraying in & around your vegetation. The plants are already stressed and pouring 150 degree water on them cannot be good. NOTE: I have recently read stories of people pouring ice cubes around their plants. This, too, actually stresses the plants rather than help them. Do not do this.

4) Using a hoe, self-irrigate or create temporary water flow channels as I show in this post. If you happen to get a rain shower, this helps direct excess water where it's most needed.

5) To also help prevent water run-off on dry hard dirt, loosen soil with a hoe by tilling the radius from between 6 to 18 inches from the plant stem (tilling too close may damage roots). This helps allow the ground to better soak up more moisture, more deeply. Water run-off can also be prevented by watering less more often, rather than watering more less often. In other words, water for 5 minutes twice a day rather than for 10 minutes once.

6) Since water on leaves should be avoided, so too should be the use of sprinklers. During hot & arid times, resort to watering with containers (like I explain in this post) or use a hand-held hose. Each method allows you to water only where it's most needed -- at or around the base of the plant. Better yet is the use of a drip irrigation system or a soaker hose. Each waters more slowly right at the soil level, preventing evaporation.

Additional tips.

1) Don't use fertilizer until after the heat wave subsides. Since fertilizer promotes new growth, it also boosts the need for more water.

2) Adding mulch around the plant is more important than ever. One or two inches of mulch helps retain water moisture & prevent the soil from drying out as fast.

3) Don't be afraid to prune back plants that appear to be suffering from the heat wave. However, don't attempt to prune if you're only trying to stimulate new growth - plants challenged by the heatwave will not benefit.

4) Removing weeds is especially important during these scorching, arid times. Each ounce of water is more valuable than ever, and sharing with weeds should not be an option.

5) Avoid spraying your plants with products that contain oil. The extreme heat combined with oil residue left behind may result in leaf burn.

Final word
Use this heat to take a much needed break from gardening -- only harvest & water as needed during the early or late day hours. Consider your time indoors (in air conditioning) like a mini-vacation, or use this extra free time planning your second-half vegetable garden. Lettuce, broccoli, cauliflower (among others) can still be planted going forward in most parts of the country.

And remember, heat waves are usually (but not always) temporary. Exerting extra effort for a few days or few weeks now will reward you with healthier crops going forward.


Resources for this article:
eHow- How to water plants in extreme heat
CBS news- Help your garden through a heat wave
Lohud.com - Coping with a garden in a heat wave

*DISCLAIMER: Before using any information contained in this blog entry, you are advised to do your own due diligence & research on the topic and/or consult with a qualified expert or professional.


Thursday, July 7, 2011

How-to Make a Plant Waterer From An Empty Cat Litter Container


Today I'm going to show you how you can make convenient garden waterers from used plastic cat litter containers. There are many benefits and few pitfalls when considering this alternative method of watering your vegetation.

Positives:

1) Cost effective. By only watering right around the roots of the plant, you are saving money on your water bill.

2) Helps reduce weed growth. Weeds will not grow as vigorously where they receive less water.

3) No need to un-coil and re-coil your hose reel, or manipulate its movement around the yard.

4) Great for keeping on stand-by. They are extremely handy when you need water on the spur of the moment, such as when you spot a starving plant at dusk.

5) Can help during times of drought when certain water restrictions are in place.

Negatives:

1) Not pretty. In addition, should also be kept out of site when not in use, otherwise may look tacky when kept within view. Empty cans may also blow around your yard when windy.

2) A bit heavy & bulky, therefore not recommended for children, elderly and some adults.

What you will need:

1) Obviously you will need a cat. Alternately, ask a cat-owning friend or family member to save their containers for you.

2) Used cat litter plastic container. Usually, these containers are sold in 14 or 20 pound containers, but occasionally you'll see them in smaller 10 lb versions (such as at Dollar General). Unless you're strong, I would recommend the 14 pound size as I will use in this demonstration (10 pounds doesn't hold enough water to be as effective).

3) Though you can use a hammer & sharp nail to make your holes, the easiest way is to use a drill. For best results, I prefer to drill many holes using smaller sized drill bits, rather than fewer holes with bigger drill bits. Water pouring out from larger holes may bend or damage sensitive or delicate plants.


Step-by-step guide:

Step 1: Rinse out the inside to get rid of any excess cat litter fragments.

Step 2: Prepare your waterer by cutting off the plastic product label.
Step 3: With cap on, drill 10 to 15 holes on top of the cap, spacing them apart as evenly as possible. You can experiment with fewer or more holes to suit your rate of sprinkle.
Step 4 (important): You will need to vent the container to help water pour out faster, smoother & more evenly. To do this, drill 3 more holes at the top of the handle. NOTE: Some water may pour from these holes when watering. To help avoid getting your hands wet, drill these holes closer to the cap as shown in my photo.
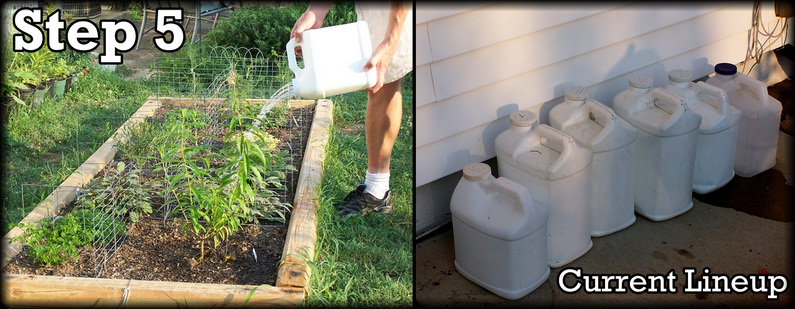
Step 5: Fill with water, transport to your destination, and begin pouring where needed.


NOTE: I keep several of these containers always filled with water (right now I have 6). I have a big back yard so I use a wheelbarrow to transport multiple containers to my destination.


Tuesday, June 21, 2011

Taking Advantage of the Rain & Mud: Supporting Fallen Potato Plants


Well if you're like me and have 2 to 3 foot maturing mounded-up potato plants, your plants may be in need of support - literally.

Almost daily these days, I walk around my rows of potatoes constantly adjusting and re-positioning my bamboo sticks to keep some fallen potato plants standing upright. But it doesn't seem to be enough.
Potato Plants, some fallen over, before supporting w/ muddy soil
Monday morning while I was doing my daily ritualistic walk in & around my garden, two things came to me: 1) I need to till in between rows to rid these grass & weeds, but can't due to the day-after-day rains (another day/another blog post), and 2) Some of my potato plants need some helping standing straight.

Then it occurred to me: Why don't I take advantage of this mud, get dirty, and pack some of it around the bases of the potato plants. BRILLIANT! Off I went.

Mounding wet dirt around potato plant base for support
Just because potato plants fall over, it does not mean that they're dead or that they can't continue to grow or prosper. I personally choose to keep them upright because it gives me peace of mind, makes my garden look tidy, and allows me to till better in-between my rows.

If there is a downside to this, it's that water might opt to run off rather than soak into the soil due to the excessive packing of the soil, but that's a trade off I'm willing to take.

Potato plants now standing upright
Hopefully this will be enough to keep the potatoes standing up straight until they're ready for harvest, but I seriously doubt it. If not, you know where I'll be after the next heavy rain -- gettin' dirty again.


Wednesday, June 1, 2011

My $90 raised-bed herb garden (Memorial Day weekend project)


Now in my 3rd year of operating a 23' X 64' vegetable garden, I felt this was the right time to tackle another gardening project -- an herb garden.

Though I'm still fairly new when it comes to culinary use, I am eager & willing to learn more -- and I just love gardening!! Besides I know plenty of people who will gladly accept whatever herbs I don't use, and that alone would make me happy.

How it all came about.

I made this garden spontaneously (though I began planning it in my head weeks ago).

It all started Sunday morning when I went to the local farmers market and noticed that their herbs had been marked down from $2.50 to $1 each. Hmmmm I thought -- this is my chance to start an herb garden, why not buy 10 of these to get started.

Then my mind started vigorously racing & planning. From previous calculating, I already knew where & what size I wanted my herb garden to be. I checked my Memorial Day Weekend Home Depot sales flyer, and there they were -- soil & landscape timber on sale. Off I went to purchase.

Here is the cost breakdown:
  • 12 8' Landscape Timber Boards (Memorial weekend sale)= $24
  • 9.5 bags 1 c. ft. Scott's Garden Soil (Memorial weekend sale)=  $24
  • 9.5 bags Generic Top Soil (Memorial weekend sale)= $10
  • 1 box 4" nails = $4
  • 24 herb plants, $1 each (clearance sale @ Farmers Market) = $24
  • Wire fencing: Already owned (bought at yard sale, used about $1 worth)
  • Estimated Tax Paid: $3
TOTAL PRICE: $90

Construction notes:


*I made two 3' X 8' raised beds from my landscape timber boards (I had 4 2' pieces leftover from which I made an extra 2X2 bed). I was thinking about making these beds 4' wide but thought it would require a little too much bending, so I settled with the 3 foot width. I used my nails to hold them together.

*Yes I'm cheap, so I mixed 50%-50% my decent Scott's Garden Soil with a bag of generic Top Soil. I combined them together in a wheel barrow using a hoe. I'm happy with this mix - time shall tell with the results.

*As mentioned earlier, our local farmers market started marking down their leftover herb plants. They were $2.50 each just a few weeks back and now they are all just $1. Seeing that they are all mostly still healthy looking, I loaded up by buying $24 herb plants - mostly perennials but a few annuals such as chamomile, dill & basil.

*Using careful calculations and some basic internet research (height, spacing etc.), I planned & diagrammed the garden accordingly with taller plants farthest from the sun (to prevent sun blockage to lower lying plants). I cut my caging to appropriate sizes to act as barriers/mini trellises.

From start to finish (mid-day Sunday to mid-day Tuesday) it took about 2 afternoons of working in 90 to 98 degree heat. Here is the end result:
Not bad for $90, dontcha think? I will post updates on the progress.